Continuing from yesterday…
My first experiment was to 3D-print a Koch snowflake. The Koch snowflake is a lovely fractal, which is made by following this very simple recipe:
- Start with a triangle.
- Glue a 1/3 scale version of the original shape onto the middle of each edge.
- Repeat step (2) with the new smaller edges, until you either get bored or die of exhaustion.
You can see the first few steps of the progression here:
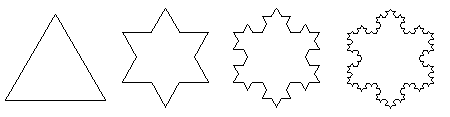
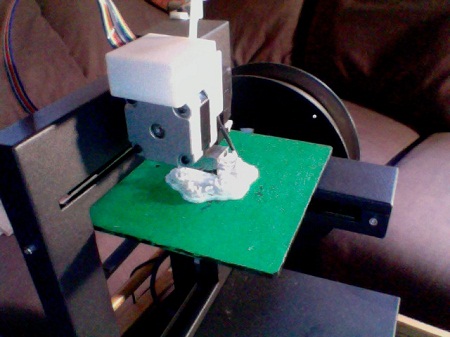
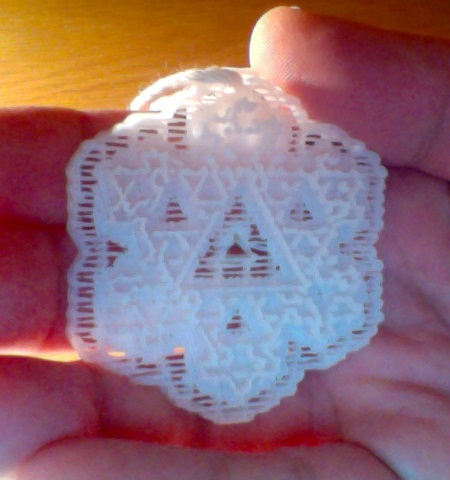
As you can see, it rather quickly turns into something that looks like a snowflake. I wrote a computer program to craft one of these babies in a format that would print onto my little home PP3DP printer. The result looked like this:

Actually, not everything in the decoration you see in that photo comes from the Koch snowflake itself. The PP3DP printer, like many 3D printers, builds things by adding them in layers, from bottom to top. To make sure things don’t collapse, it starts with a loose backing, which you can later peel off. You can get a better sense of this by looking at the printer in the act of printing a snowflake (that’s my couch in the background):
I decided to keep the backing on, because I like the way it visually framed the fractal, and also because it gave me an easy place to attach a string, for hanging each snowflake onto the tree.
To give the decoration more of that nice wispiness that helps make snowflakes so lovely, I decided to replace each of the triangles with a Sierpinski triangle. Like the Koch snowflake, the Sierpinski triangle can also be made by following a very simple recipe:
- Start with a triangle.
- Replace all triangles with three 1/2 scale triangles, each tucked into one of the bigger triangle’s vertices.
- Repeat step (2) with the new smaller triangles, until you either get bored or die of exhaustion.
You can see the first few steps of the progression here:

When I replaced each triangle of the Koch snowflake with a Sierpinski triangle, this is the first version that came out of the 3D printer:
At this point I realized that there was a bug in my program, which was causing many parts of the fractal to be left out (although I think it still looks cool). I fixed the bug before heading to the party, but alas, in my excitement I forgot to take another photo before I left.
I can assure you there is now a lovely Sierpinski-Koch snowflake dangling from the festive tree in my friends’ house. But if you want to see it in person, you might just need to get yourself invited to their party next year. 🙂
This is SO beautiful! And looks so precise! Also looks snow-white: is this a different 3D printer from the one you had in Banff? Do you also control the color? Wow!!! 🙂
Thanks!!
It is indeed a different 3D printer from the one I had in Banff.
I can make things in any color, as long as that color is white. 🙂
So you have one at home now? I think I’m on the list for something from you, aren’t I? I’ll have to dig out that email..but I’d settle for a snowflake…
Yes, Sally, Santa and I get mistaken for each other all the time. It causes so many mixups. In case it helps clear things up, I’m the one without the beard….